W3C测试教程

配置
完成以下步骤后再推进
- 步骤 1: 创建CSSWG Test Manager的账号
https://test.csswg.org/shepherd/register/- 记得勾选"Request Repository Write Access"
- 步骤 2: 安装Mercurial
http://wiki.csswg.org/tools/hg/install - 步骤 3: 配置Mercurial
http://wiki.csswg.org/tools/hg#setting-up-mercurial-preferences
按向下的箭头查看其他步骤
- 步骤 4: 复制CSSWG测试代码库
http://wiki.csswg.org/tools/hg#initial-clone-of-the-central-repository - 步骤 5: 复制Resources目录
http://wiki.csswg.org/tools/hg#initial-clone-of-the-central-repository
Reftest概览
- 两个文件: 测试文件 + 参考文件
- 测试文件使用了你要测试的功能
- 参考文件没有使用待测功能,但在视觉匹配上是一样的
- 自描述(手工和自动测试都适用)
- 跨浏览器并且跨平台
目录结构
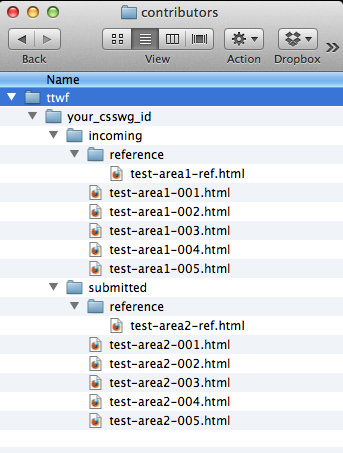
- CSSWG测试代码库
- contributors
- ttwf_bj
- your_csswg_id
- incoming
- submitted
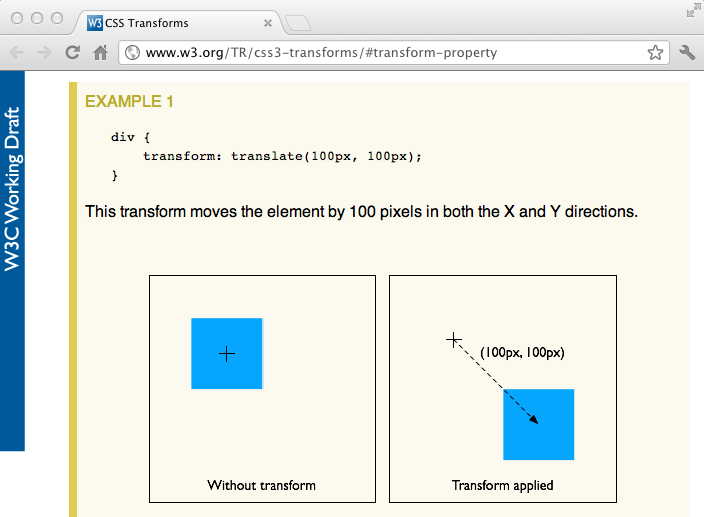
测试用例示例
CSS3 Transforms规范中transform属性的一个基本测试:使用translate()函数
规范链接:
http://www.w3.org/TR/css3-transforms/#transform-property
http://www.w3.org/TR/css3-transforms/#two-d-transform-functions
步骤 1 - OSX
按向下的箭头查看Windows的操作指令
更新你本地的CSSWG测试库
请完成该步骤,除非你刚把测试库复制下来
在终端中键入如下命令:
$ cd [path to repo]/test
$ hg pull -u
$ ls -lR contributors/ttwf/samples
注: 这些文件也可以从这里获取到:
ttwf-reftest-tutorial-starter.zip
步骤 1 - Windows
按向上的键头查看OS X的操作指令
更新你本地的CSSWG测试库
请完成该步骤,除非你刚把测试库复制下来
在终端中键入如下命令:
> cd [path to repo]\test
> hg pull -u
> dir contributors\ttwf\samples
注: 这些文件也可以从这里获取到:
ttwf-reftest-tutorial-starter.zip
步骤 2 - OSX
按向下的箭头查看Windows的操作指令
为你的新测试创建一个目录
$ cd [path to repo]/test/contributors/ttwf/
$ mkdir -p yourName/incoming
$ cd yourName/incoming
步骤 2 - Windows
按向上的箭头查看OS X的操作指令
为你的新测试创建一个目录
> cd [path to repo]\test\contributors\ttwf
> mkdir yourName\incoming
> cd yourName\incoming
步骤 3 - OSX
按向下的箭头查看Windows的操作指令
将起始文件拷贝到你的incoming目录
在之前创建的incoming目录中
$ cp -R ../../samples/ttwf-reftest-tutorial-starter/* .
步骤 3 - Windows
按向上的箭头查看OS X的操作指令
将起始文件拷贝到你的incoming目录
在之前创建的incoming目录中
> xcopy /e ..\..\samples\ttwf-reftest-tutorial-starter .
步骤 4
在文本编辑器中打开ttwf-reftest-tutorial-starter-001.html
步骤 5.1
添加测试元数据
Title和Author
    <!DOCTYPE html>
     <html>
         <head>
         <title>CSS Transforms Test: transform property with translate function</title>
         <link rel="author" title="Your Name" href="mailto:youremail@address.com">
             . . .
注: 在CSSWG Wiki上有关于元数据的详细信息
http://wiki.csswg.org/test/format#template-details
步骤 5.2
添加测试元数据
参考文件的路径
      <!DOCTYPE html>
       <html>
           <head>
              . . .
              <link rel="match" href="reference/ttwf-reftest-tutorial-starter-ref.html">
              . . .
注: 在CSSWG Wiki上有关于元数据的详细信息
http://wiki.csswg.org/test/format#template-details
步骤 5.3
添加测试元数据
规范链接
<!DOCTYPE html>
<html>
    <head>
        . . .
        <link rel="help" href="http://www.w3.org/TR/css3-transforms/#transform-property">
        <link rel="help" href="http://www.w3.org/TR/css3-transforms/#two-d-transform-functions">
        . . .
注: 在CSSWG Wiki上有关于元数据的详细信息
http://wiki.csswg.org/test/format#template-details
步骤 6
给测试元素添加transform属性
                    <style type="text/css">
                         .greenSquare {
                             position: absolute;
                             top: 0;
                             left: 0;
                             width: 100px;
                             height: 100px;
                             transform: translate(100px,100px);
                         }
                         . . .
                     </style>
步骤 7
创建一个只在失败时可见的元素
                     <style type="text/css">
                         . . .
                         .redSquare {
                             position: absolute;
                             width: 98px;
                             height: 98px;
                             top: 101;
                             left: 101;
                         }
                     </style>
步骤 8.1
添加绿色填充颜色以显示通过状态
                      .greenSquare {
                          position: absolute;
                          top: 0;
                          left: 0;
                          width: 100px;
                          height: 100px;
                          transform: translate(100px,100px);
                          background: green;
                      }
步骤 8.2
添加红色填充颜色以显示失败状态
                   .redSquare {
                       position: absolute;
                       width: 98px;
                       height: 98px;
                       top: 101;
                       left: 101;
                       background: red;
                   }
              </style>
步骤 9
在测试页上添加一句话使它变成自描述的测试
         <body>
             <p>The test passes if there is a green square and no red.</p>
             . . .
         </body>
步骤 10
在文本编辑器中打开reference/ttwf-reftest-tutorial-starter-ref.html
步骤 11
添加参考文件的元数据
Title和Author
     <!DOCTYPE html>
     <html>
         <head>
         <title>CSS Transforms Reference file</title>
         <link rel="author" title="Your Name" href="mailto:youremail@address.com">
         . . .
步骤 12
将参考元素的位置和颜色信息完全匹配测试文件的通过状态
                     <style type="text/css">
                         .greenSquare {
                             position: absolute;
                             width: 100px;
                             height: 100px;
                             top: 100;
                             left: 100;
                             background: green;
                         }
                     </style>
步骤 13
并添加自描述的句子
         <body>
             <p>The test passes if there is a green square and no red.</p>
             . . .
         </body>
步骤 14
在浏览器中检查你的测试和参考文件,确认它们是相同的
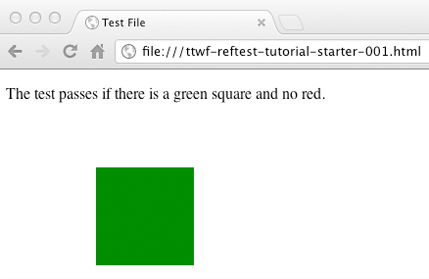
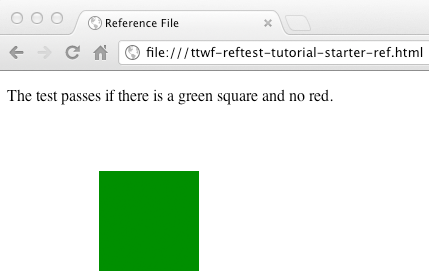
失败测试的例子
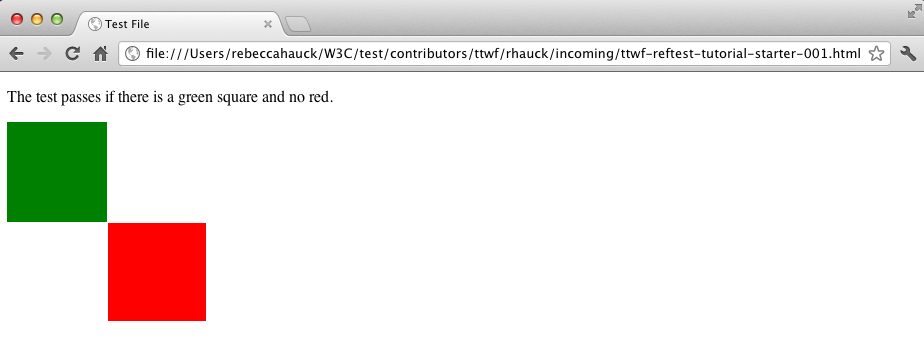
提供商前缀
- 在你开发测试时可能需要给CSS属性添加提供商前缀
- 如果前缀是必要的,那么没有的话测试显然会失败
- 但是,当把测试提交到W3C时不能包含这些前缀
按向下的箭头查看本例的带提供商前缀的版本
                        .greenSquare {
                              position: absolute;
                              top: 0;
                              left: 0;
                              width: 100px;
                              height: 100px;
                              -webkit-transform: translate(100px,100px);
                              -moz-transform: translate(100px,100px);
                              -ms-transform: translate(100px,100px);
                              -o-transform: translate(100px,100px);
                              background: green;
                          }
按向下的箭头查看手工添加提供商前缀的另一个方法
在测试开发时我们推荐使用的脚本:
http://leaverou.github.com/prefixfree
prefixfree.jsapi.js扩展可用于无前缀的JS API测试:
https://github.com/LeaVerou/prefixfree/tree/gh-pages/plugins
在测试开发中,像这样引用这些脚本:
            <-- 记得在提交给W3C前移除 -->

            <script src="prefixfree.js"></script>
            <script src="plugins/prefixfree.jsapi.js"></script>
步骤 15 - OSX
按向下的箭头查看Windows的操作指令
将你的测试和参考文件添加到代码库中
$ cd [path to repo]/test/contributors/ttwf/yourName/incoming
$ hg add ttwf-reftest-tutorial-001.html
$ hg add reference
$ hg commit -m "TTWF reftest tutorial"
$ hg push
注: 如果你收到如下错误信息:
abort: push creates new remote head ...
Your local repository is out of sync with the test repository
按如下的步骤来解决问题:
只在你收到上述错误时进行以下步骤
$ hg pull
$ hg merge
$ hg commit -m "Merge"
$ hg push
步骤 15 - Windows
按向上的箭头查看OS X的操作指令
将你的测试和参考文件添加到代码库中
> cd [path to repo]\test\contributors\ttwf\yourName\incoming
> hg add ttwf-reftest-tutorial-001.html
> hg add reference
> hg commit -m "TTWF reftest tutorial"
> hg push
注: 如果你收到如下错误信息:
abort: push creates new remote head ...
Your local repository is out of sync with the test repository
按如下的步骤来解决问题:
只在你收到上述错误时进行以下步骤
> hg pull
> hg merge
> hg commit -m "Merge"
> hg push
步骤 16
请规范专家检查你的测试
步骤 17 - OSX
按向下的箭头查看Windows的操作指令
整合反馈意见并将测试移到submitted目录
$ cd [path to repo]/test/contributors/ttwf/yourName
$ hg pull -u
$ hg merge
$ hg commit -m "merging"
$ hg mv incoming/ttwf-reftest-tutorial-001.html submitted/ttwf-reftest-tutorial-001.html
$ hg mv incoming/reference/ttwf-reftest-tutorial-ref.html submitted/reference/ttwf-reftest-tutorial-ref.html
$ hg commit -m "moved the TTWF reftest tutorial to the submitted folder"
$ hg push
步骤 17 - Windows
按向上的箭头查看OS X的操作指令
整合反馈意见并将测试移到submitted目录
> cd [path to repo]\test\contributors\ttwf\yourName
> hg pull -u
> hg merge
> hg commit -m "merging"
> hg mv incoming\ttwf-reftest-tutorial-001.html submitted\ttwf-reftest-tutorial-001.html
> hg mv incoming\reference\ttwf-reftest-tutorial-ref.html submitted\reference\ttwf-reftest-tutorial-ref.html
> hg commit -m "moved the TTWF reftest tutorial to the submitted folder"
> hg push
W3C JavaScript
测试教程
JavaScript测试概览
- JavaScript测试通过编程的方式验证功能
- JavaScript测试比起参考测试有几点优势
- 健壮
- 灵活
- 性能好
- 强大
- 参考测试比起JavaScript测试有几点优势
- 验证完整的渲染
- 易于理解
- 对于不支持JavaScript的客户端也可以工作
- 避免引入额外的技术 (JS)
JavaScript测试概览 (续)
- JavaScript可以和参考测试一起使用
- 测试可以同时包含参考文件和JavaScript代码块
- 参考测试部分不需要脚本引擎
- JavaScript部分可以自动化
- 自描述的参考测试是推荐的测试格式
- JavaScript测试应该在如下场景中使用
- 测试JavaScriptAPI或行为 (比如: CSSOM规范)
- 给参考测试添加自动化
- W3C提供了一个框架(testharness.js)来简化JavaScript测试的编写
测试框架
testharness.js和testharnessreport.js
<script src="/resources/testharness.js"></script>
<script src="/resources/testharnessreport.js"></script>
- 常用验证的JavaScript API
- 在testharness.js的注释区域有文档描述
- 所有的JavaScript测试都应该使用
按向下的箭头获取更多信息
- 路径必须是根级的/resources目录
- 在本地,resources目录可以放在任何位置
- 在提交到CSSWG测试库前, 路径必须匹配上面的示例
- 测试文件中应该存在
id="log"的元素- 测试结果表格会添加到这个元素,如果存在的话
测试函数
test(test_function, name, properties)
- 用于同步测试
- testharness.js中定义的
async_test()是用于异步测试的
- testharness.js中定义的
- 实现在testharness.js中
- 用于定义一个独立的测试用例
- 一个文件通常有多个
test()的调用
- 一个文件通常有多个
- testharness.js对于每一个
test()调用会显示PASS/FAIL信息
按向下的箭头获取更多的信息
test() 参数 1: test_function
test(test_function, name, properties)
test_function必须是一个对象,不是一个函数调用test_function应该包含测试断言方法- 如果内置的断言方法不能满足需求, 看一下testharness.js如何自己编写一个
- 断言的结果会决定PASS/FAIL
- 用法例子:
test(function() { assert_true(true) }, name, properties)
test() 参数 2: Name
test(test_function, name, properties)
name是用于标识测试的字符串name应该简短,唯一,并且不会改变name会显示在测试结果表格里- 用法例子:
test(function() { assert_true(true) }, "test_name", properties)
test() 参数 3: Properties
test(test_function, name, properties)
properties使用覆盖默认值的对象properties是可选参数- 可识别的属性包括
timeout和metadata - 用法例子:
 test(function() { assert_true(true) }, "test_name",

 {timeout:1000,

 help: 'http://www.w3.org/TR/spec#section',

 author: ['Bill Gates <bgates@msn.com>', 'Steve Jobs http://apple.com/sjobs'],

 assert: 'This should always be true.'})
关于定于测试元数据的细节, 可以查看CSSWG Script Test Wiki Page
断言方法
- testharness.js提供了很多断言方法
- testharness.js的注释里有完整的方法列表
- 它们通常用于为
test()服务的test_function中
- 所有的断言方法包含一个可选的
description参数,只在断言失败的时候才输出- 用于提供额外的调试信息
- 所有的断言必须位于对
test()的调用中- 位于外边的断言不会被正确地检测,并可能导致测试停止
按向下的箭头获取详细的信息
断言示例
assert_equals(actual, expected, description)
actual: 所测功能的实际值expected: 期望值description(可选): 仅在断言失败时输出- 用法例子:
assert_equals(getActualData("myElement"), 100, "Expected value for myElement is 100")
测试用例示例
CSS3 Transforms规范中transform属性的一个基本测试:使用translate()函数
与参考测试的例子类似, 但这次测的是API而不是渲染
规范链接:
http://www.w3.org/TR/css3-transforms/#transform-property
http://www.w3.org/TR/css3-transforms/#two-d-transform-functions
按向下的按钮获取更多的信息

步骤 1
复制一份JavaScript起始文件
在文本剪辑器中打开ttwf-js-tutorial-001.html
<!DOCTYPE html>
<html>
<head>
    <title>CSS Transforms API Test: transform translate</title>
    <link rel="author" title="Your Name" href="mailto:youremail@address.com">
    <link rel="help" href="http://www.w3.org/TR/css3-transforms/#transform-property">
    <link rel="help" href="http://www.w3.org/TR/css3-transforms/#two-d-transform-functions">
    <meta name="assert" content="The transform should be translate(100px,100px)">
</head>
<body>
</body>
</html>
步骤 2
更新元数据
- 更新
author元数据 - 添加
flags元数据flags描述了测试的先决条件- 完整的
flags列表在CSSWG Wiki上可以查到Test Format
- 例子:
<title>CSS Transforms API Test: transform translate</title>
<link rel="author" title="Jim Tester" href="mailto:jimmyt@yahoo.com">
<link rel="help" href="http://www.w3.org/TR/css3-transforms/#transform-property">
<link rel="help" href="http://www.w3.org/TR/css3-transforms/#two-d-transform-functions">
<meta name="flags" content="dom">
<meta name="assert" content="The transform should be translate(100px,100px)">
步骤 3
导入W3C JavaScript测试框架文件
将如下代码添加到head块里
...
<script src="/resources/testharness.js"></script>
<script src="/resources/testharnessreport.js">></script>
...
注: 在开发过程中, resources目录的路径应该和该目录在本地的位置相匹配
在提交到CSSWG测试库前,脚本的路径必须指向/resources目录
检查点
head块应该显示如下
author元数据应该包含你实际的名字和邮箱
<!DOCTYPE html>
<html>
<head>
  <title>CSS Transforms API Test: transform translate</title>
  <link rel="author" title="Your Name" href="mailto:youremail@address.com">
  <link rel="help" href="http://www.w3.org/TR/css3-transforms/#transform-property">
  <link rel="help" href="http://www.w3.org/TR/css3-transforms/#two-d-transform-functions">
  <meta name="flags" content="dom">
  <meta name="assert" content="The transform should be translate(100px,100px)">
  <script src="/resources/testharness.js"></script>
  <script src="/resources/testharnessreport.js"></script>
</head>
...
步骤 4
添加一个div到<body>中以作为测试元素
...
<body>
    <div id="myDiv"></div>
<body>
...
transform 将应用于该元素
步骤 5
添加一个id="log"的<div>用于显示测试结果
...
<body>
    <div id="myDiv"></div>
    <div id="log"></div>
<body>
...
testharness.js会添加包含测试结果的HTML表格到该元素
步骤 6
创建一个<script> 块来包含JavaScript代码
...
<body>
   <div id="myDiv"></div>
   <div id="log"></div>
   <script>
   </script>
<body>
...
检查点
文件内容应该显示如下
<!DOCTYPE html>
<html>
<head>
  <title>CSS Transforms API Test: transform translate</title>
  <link rel="author" title="Your Name" href="mailto:youremail@address.com">
  <link rel="help" href="http://www.w3.org/TR/css3-transforms/#transform-property">
  <link rel="help" href="http://www.w3.org/TR/css3-transforms/#two-d-transform-functions">
  <meta name="flags" content="dom">
  <meta name="assert" content="The transform should be translate(100px,100px)">
  <script src="/resources/testharness.js"></script>
  <script src="/resources/testharnessreport.js"></script>
</head>
<body>
  <div id="myDiv"></div>
  <div id="log"></div>
  <script>
  </script>
</body>
</html>
步骤 7
用JavaScript设置测试元素的transform
...
<body>
   <div id="myDiv"></div>
   <div id="log"></div>
   <script>
       // Set the transform
       document.getElementById("myDiv").style.transform = "translate(100px,100px)";
   </script>
</body>
</html>
步骤 8
在script块中添加一个test()的调用
在test_function中使用assert_equals
...
<body>
<div id="myDiv"></div>
<div id="log"></div>
<script>
// Set the transform
document.getElementById("myDiv").style.transform = "translate(100px,100px)";

// Verify that the transform was set as expected
test(function() {assert_equals( //test arg1: test_function
        document.getElementById("myDiv").style.getPropertyCSSValue("transform").cssText, //assert_equals arg 1: actual
        "translate(100px,100px)", //assert_equals arg 2: expected
        "transform should be translate(100px,100px)")}, //assert_equals arg 3: description
        "Transform_Translate_100px_100px");  //test arg2: name
</script>
</body>
</html>
参数的注释只用于澄清用途, 可以忽略
完整的文件
<!DOCTYPE html>
<html>
<head>
   <title>CSS Transforms API Test: transform translate</title>
   <link rel="author" title="Your Name" href="mailto:youremail@address.com">
   <link rel="help" href="http://www.w3.org/TR/css3-transforms/#transform-property">
   <link rel="help" href="http://www.w3.org/TR/css3-transforms/#two-d-transform-functions">
   <meta name="flags" content="dom">
   <meta name="assert" content="The transform should be translate(100px,100px)">
   <script src="/resources/testharness.js"></script>
   <script src="/resources/testharnessreport.js"></script>
</head>
<body>
   <div id="myDiv"></div>
   <div id="log"></div>
   <script>
       document.getElementById("myDiv").style.transform = "translate(100px,100px)";
       test(function() {assert_equals(
               document.getElementById("myDiv").style.getPropertyCSSValue("transform").cssText,
               "translate(100px,100px)", "transform should be translate(100px,100px)")},
               "Transform_Translate_100px_100px");
   </script>
</body>
</html>
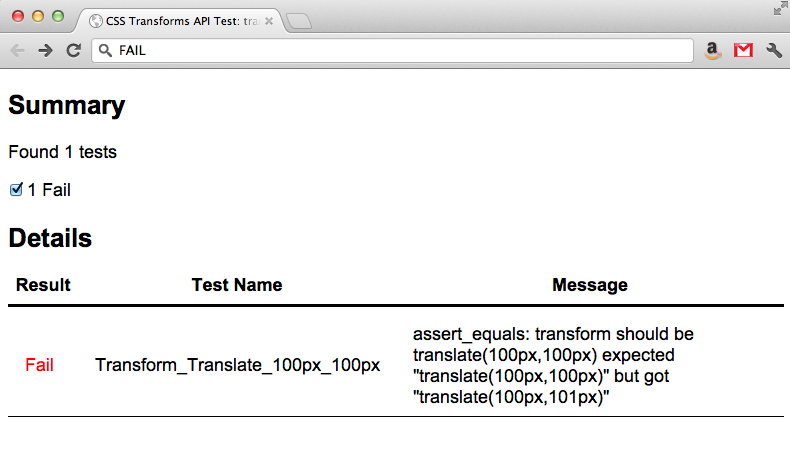
通过的例子
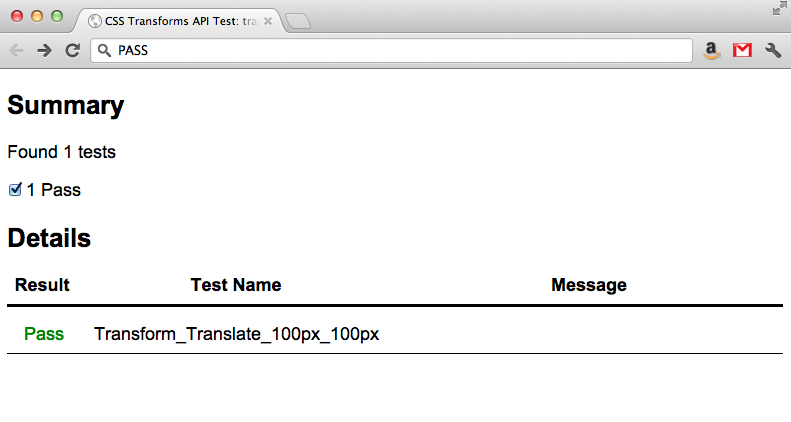
失败的例子
步骤 10 - OSX
按向下的箭头获取Windows的操作指令
将你的测试文件添加到代码库
$ cd [path to repo]/test/contributors/ttwf/yourName/incoming
$ hg add ttwf-js-tutorial-001.html
$ hg commit -m "TTWF JavaScript tutorial"
$ hg push
如果你收到如下错误信息:
abort: push creates new remote head ...
Your local repository is out of sync with the test repository. 这样解决:
$ hg pull
$ hg merge
$ hg commit -m "Merge"
$ hg push
步骤 10 - Windows
按向上的箭头获取OS X的操作指令
将你的测试文件添加到代码库
> cd [path to repo]\test\contributors\ttwf\yourName\incoming
> hg add ttwf-js-tutorial-001.html
> hg commit -m "TTWF JavaScript tutorial"
> hg push
如果你收到如下错误信息:
abort: push creates new remote head ...
Your local repository is out of sync with the test repository. 这样解决:
> hg pull
> hg merge
> hg commit -m "Merge"
> hg push
步骤 11
请规范专家检查你的测试
步骤 12 - OSX
按向下的箭头获取Windows的操作指令
整合反馈意见并将测试移到submitted目录
$ cd [path to repo]/test/contributors/ttwf/yourName
$ hg mv incoming/ttwf-js-tutorial-001.html submitted/ttwf-js-tutorial-001.html
$ hg commit -m "moved the TTWF JavaScript tutorial to the submitted folder"
$ hg push
步骤 12 - Windows
按向上的箭头获取OS X的操作指令
整合反馈意见并将测试移到submitted目录
> cd [path to repo]\test\contributors\ttwf\yourName
> hg mv incoming\ttwf-js-tutorial-001.html submitted\ttwf-js-tutorial-001.html
> hg commit -m "moved the TTWF JavaScript tutorial to the submitted folder"
> hg push
祝贺你!
你已经完成了W3C参考测试和JavaScript测试
参考资料
Mercurial命令参考
- 基本命令:
- hg pull (gets the latest changes from the CSSWG Test repo)
- To update after pull, use: hg pull -u (alleviates need to do hg update)
- hg update (applies the latest changes pulled to your local repo)
- hg status (displays list of locally changed files)
- hg add (stages a new or modified local file for commit)
- hg remove (stages the removal of a local file for commit)
- hg merge (merges local changes with updates pulled from CSSWG Test repo)
- hg commit (commits local changes to local repository)
- To include commit message, use: hg commit -m "Commit message here"
- hg push (pushes local changes to the CSSWG Test repository)
按向下的箭头获取更多信息
- 用户想更新本地的代码库:
- hg pull -u (pulls and applies latest changes from CSSWG repo to local repo)
- 用户想推送本地的变化:
- hg status (check which files are stages for commit)
- hg add fileName (stages file for commit, repeat for each file)
- hg status (confirm all files are stages for commit)
- hg commit -m "Commit message here" (Commit to local repo)
- hg push (pushes locally committed changes to CSSWG Test repo)
按向下的箭头获取更多信息
- 用户在推送时出现错误信息
abort: push creates new remote head ...- hg pull (gets newest changes from CSSWG Test repo)
- hg merge (merges newest changes from CSSWG Test repo with local changes)
- hg commit -m "Merge" (commits the merge to local repo)
- hg push (pushes changes to CSSWG Test repo)